


You’ve been publishing content to your blog for years. Now you have a library of 100/1,000/10,000 posts. Some are performing well, generating lots of traffic and conversions. Others are buried deep in the search results, getting only a handful of visits each month.
But creating each one of those 100/1,000/10,000 posts cost you something, whether it was time, money, or effort. If those posts aren’t being discovered and viewed, you’re no longer generating any return on those investments.
Updating old blog posts helps you hit the reset button on their performance so that they start generating returns for you again.
Why should you update old blog posts?
In all likelihood, your old blog posts are no longer accurate, lack links to posts you’ve published more recently, are out of sync with your current content guidelines, are not up to your quality standards… the list goes on.
More importantly, outdated content inevitably declines in search rankings, driving less traffic to your site than it used to and generating fewer conversions for whatever it is you’re marketing.
Refreshing that old content lets you not only bring old blog posts up to your current quality standards and tie them into what you’re producing now via internal links, but it also resuscitates those old blog posts so they climb up the search rankings, earn more backlinks, and generate more traffic and conversions.
When you leave your old blog posts to languish and decay, you’re essentially wasting the time and money you invested in getting those posts published.
Instead of continually creating new content, you’re often much better off spending time updating old blog posts to make your investment in that content continue to deliver for your business.
How to identify which blog posts need to be updated
Below are the key indicators I look for to determine if a blog post needs to be updated:
- Its rankings have dropped. I highly recommend using a daily keyword rank tracker to monitor shifts in your rankings. This makes it really easy to determine when a post needs to be updated. If its rankings drop and stay there, it’s time to update the post.
- It’s getting less traffic than it used to. If you haven’t been using a rank tracker, you can use Google Analytics to find posts that are bringing less traffic to your site than they used to.
- It’s ranking in the top results but is not the top result. Posts ranking in positions 2-5 of the search results can often overtake their SERP competition after a content refresh.
- It’s ranking in positions 10-30. Posts that kind of rank — but not well enough to generate significant traffic — are usually posts that have good content but aren’t well optimized for search. Updating these with an eye for SEO can significantly boost their rankings.
Keep in mind, though, that these are all indicators that a post might need to be updated. What you really want to get to is a list of posts that should be updated.
For that reason, I never just update everything I discover using the criteria above. I take the list of posts I find and then determine if refreshing those posts will help me hit my goals.
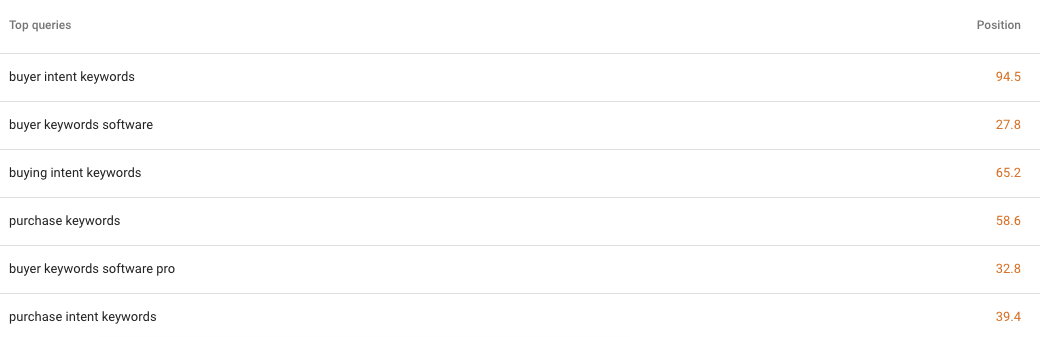
For example, if the posts I discover rank well for either purchase intent keywords or solution intent keywords, I absolutely update them because I know higher rankings will help me hit my goal of generating more revenue for the business.
The posts you need to prioritize updating are those that match one or more of the key indicators above and are very likely to help you hit whatever goals you’re trying to achieve.
How to update old blog posts for SEO
With the list of content you need to update in hand, follow this 10-step process to update those old blog posts for more effective SEO.
1. Find the keywords the post is already ranking for
The very first thing you want to do is identify the keywords that the post is already ranking for.
You can do this in Google Search Console by narrowing down to look at a specific page and then viewing the keywords that page ranks for:
However, even when I have access to Google Search Console, I generally use an SEO tool like Semrush or Ahrefs for this step.

I’ve found that position data in Google Search Console is often way off. It will say that a keyword ranks in the number-one spot, but when I search for that keyword in Google, I can’t find that post in the top 100 results.
Another issue is that Google Search Console will often show you all kinds of weird, random, unrelated keywords that have little-to-no search volumes.
Because SEO tools don’t track every single keyword anyone has ever typed into Google Search, they’re better at showing only the keywords with reasonable search volumes — and that are more likely to be relevant to the content.
With that said, you can use any of the tools above to identify keywords that might be worth targeting in your refreshed blog post.
For this step, all you need to do is write down the keywords, positions, and volumes for any keyword where the post is ranking in positions 1-20.
2. Pick a keyword to target when updating your post
When updating and optimizing an old blog post, you’re going to want to select both a target (main) keyword and, potentially, one or more secondary keywords.
I wish there was a way to tell you exactly how to identify what your target keyword should be every single time, but the reality is that there are a lot of different things to consider.
There’s only one thing that’s true 100% of the time: The target keyword you select must match the search intent for that keyword.
When considering a target keyword, search for that keyword in Google and make sure that the top results are similar to your existing post’s content — or the content of the updates you’re planning to make.
After that, there are a variety of things to consider.
- Is the post currently ranking in the top five results for any keywords? If so, do those keywords have adequate search volumes? If you can find a keyword with decent volume that’s currently ranking in the top five positions, your update could earn you the number-one ranking or a featured snippet.
- How likely is it that your post will be competitive for that keyword? Use MozBar, Semrush, or Ahrefs to see if your domain and page authority scores are comparable to those of the results that are currently outranking your post.
- Is there a lower-ranked keyword that would be better to target? Maybe your post is ranking really well for a top-of-funnel keyword, but it’s also ranking somewhat well for a purchase intent keyword. You might want to capitalize on its equity for the purchase intent keyword to optimize the post for more conversions.
But be careful when choosing a target keyword your post isn’t already ranking for.
If the post you’re updating is already ranking really well for specific keywords — and you rewrite the post and optimize it for different keywords simply because those keywords have higher search volumes — you can actually lose traffic and rankings after your update.
Ideally, you want to take advantage of the equity you’ve already earned from search engines.
So if your post is ranked #2 for the keyword “digital marketing software,” don’t try to switch things up and get it to rank for “digital marketing tools” because that phrase has more search volume. Just try to get it to #1 for “digital marketing software.”
3. See if there are secondary keywords you should target
After you’ve identified your target keyword, do a little more keyword research to identify any other potential keywords/topics you should make sure are covered in the updated post.
Start by searching for your target keyword in Google. Look for a “People Also Ask” box. See if there are any questions listed that would make sense to cover in your blog post.
You can also use a keyword research tool to find additional topics to cover and questions to answer:
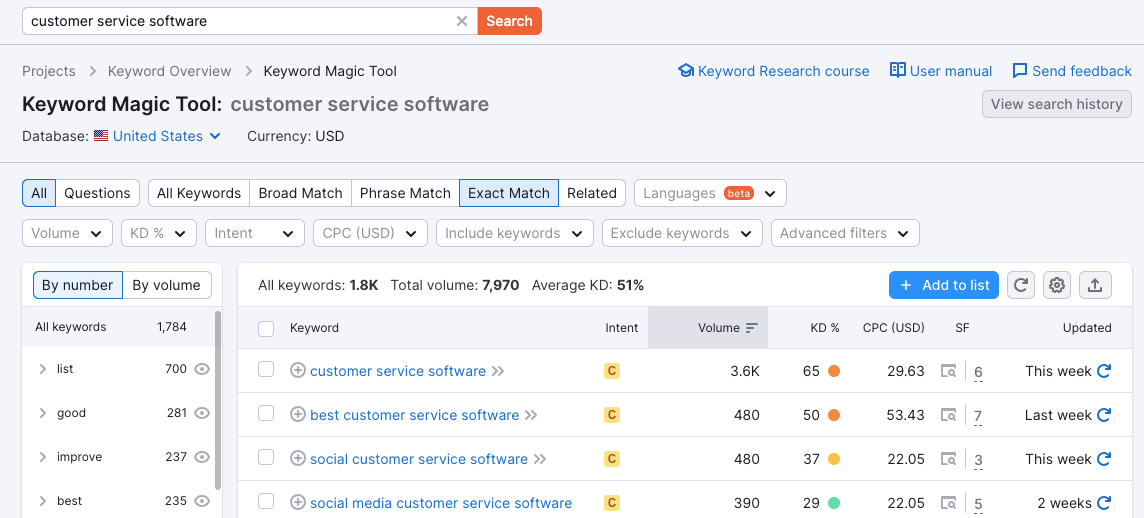
Add any secondary keywords to your keyword list. Now, you should have a long list of additional topics you might want to cover in your updated post.
4. Check your content library for related content
If you’ve been blogging for a while or are working for a company that has had multiple writers and content marketers working on your blog over the years, there’s a chance that you might have multiple blog posts about the same topic.
One really easy way to update your content and get a rankings boost is to just combine similar content into a single post.
First, pop all of the URLs for your related content into Ahrefs or Google Search Console to find out which post ranks highest for the keyword you’re planning to target.
Whichever one is currently ranking highest is the URL you should use for your consolidation because it has the most existing equity for that term with Google.
After you’ve combined the posts, delete the posts with the content that you added to the post you’re updating, and create 301 redirects from those URLs to your new post.
This will ensure that any backlinks pointing to those old URLs are passed on to your updated post to boost its rankings.
5. Look at the top results for your target keyword
When someone types a query into a search engine, they have an intent. Google’s goal is to interpret that intent and surface the content that best satisfies it.
For this reason, there’s no better source for determining what your post needs to include than Google’s search results. Essentially, Google’s search results tell you exactly what people are looking for when they type any query into its search engine.
Look at any features on page one of the search results. Are there video or news carousels? Are there image blocks? Are there shopping results? Is there a local map pack?
Each of these features provides some insight into what people are looking for when they search for that keyword.
For example, if there’s a video carousel, a video featured snippet, or organic results with video rich snippets, it suggests that people might prefer to watch videos to learn more about your topic. Consider creating a video and embedding it into your post.
Look at the titles of the page-one-ranked results. Are they all lists (e.g. the 10 best [whatever])? If so, people probably prefer to read list posts for that query.
See if there’s a featured snippet for your target keyword. Do you own the featured snippet? If not, make a note of the type of featured snippet that is displayed (paragraph, list, table, video, etc.). You’ll want to format your updated post to try and capture the featured snippet.
Finally, open each result on page one and read through the content. What topics do these posts cover that might be worth covering in your post? What don’t they cover that they probably should (and that you definitely should)?
Use all of this information to create a plan for what your updated post needs to be, do, and include.
6. Search for any secondary keywords you’re planning to target
A single post can capture more than one featured snippet. For this reason, I like to search for not only my target keyword but my secondary keywords as well.
If any of my secondary keywords has its own unique featured snippet, I make a note of the type of featured snippet and add that detail to my content plan.
7. Update your blog post
Using all of the information you gathered in the steps above, update your blog post:
- Refresh the existing content. Be an editor for the existing post. Make sure all of the links still work. Make sure all of the content is still accurate and relevant. Update outdated screenshots. Add new screenshots. Fix any grammar/spelling/formatting errors.
- Add additional content. Some of the additional content you’re adding might be things you identified in the steps above that should be included. Some of it might be filling gaps in the existing content. Some of it might be examples/anecdotes from your own knowledge/research.
- Optimize for your target keyword. If it’s possible to do without sounding like a robot, I try to include my target keyword in three places: once in the blog post’s main title, once in the introduction, and once in one subheader. But I don’t force it. If it feels awkward to use my target keyword in any of those places, I don’t do it.
- Format your content for featured snippets. If you’re targeting a list featured snippet, include a list in your content. If you’re targeting a paragraph featured snippet, write a couple of succinct sentences that describe the concept you’re explaining. Make sure that you’re using headers correctly.
- Add internal links. It’s almost a guarantee that you’ve written new, related content since the original post was published that you can link to when updating your blog post.
- Write alt text for any included images. Make sure any images you’re using in the post — old or new — have relevant and descriptive alt text.
- Make sure your title isn’t getting truncated in search results. If you’re not changing the title of the post you’re updating, make sure it displays fully in the search results. If you are changing the title, see how many characters display for the existing results and try to stay within that character count.
Finally, do not update the URL unless you absolutely have to. For the best results, leave the URL as-is to retain 100% of the equity it’s earned from Google.
If you absolutely must update the URL, make sure to 301 redirect the old URL to the new one.
8. Run your updated post through a natural language processing tool
My tool of choice for this is Clearscope. Clearscope is great because it tells you not only what words Google expects to see in your post, but also what words should appear as headings in your post. This can help you find gaps in your content that you can fill before you publish.
For example, if you’re updating a tool roundup post covering the best marketing automation tools, Clearscope might tell you that it recommends adding HubSpot, which means Google expects to see HubSpot included in a list like yours.
I’ve seen ranking increases for posts that were previously stuck simply by adding a couple of additional tools to them that Clearscope recommended, so now I run all new content and updates through Clearscope before publishing.
9. Document your existing rankings before publishing the update
Most of the time, I see positive results after updating a post. But occasionally, a post I’ve updated — particularly if it was ranking really well for certain keywords to begin with — will lose rankings after an update.
When that happens, you can go back in, make a few changes, and recover, but to do so, you need a way to see the impact your changes had on rankings.
And even if the changes are positive, you’ll probably want a way to see those positive changes (and possibly show them to your boss or a client).
There are many ways to track pre- and post-update rankings. A low-tech option is to just search for your target keyword and each secondary keyword and make a note of their pre-update positions in your project management tool.
Then, a week or two after publishing your update, you can search for those keywords again to see if your rankings improved or declined.
However, it’s far simpler to just use a daily rank tracking tool. I currently use Semrush for this, but I’ve also used and liked SE Ranking, Authority Labs, and AccuRanker.
To use these tools, simply add the keywords(s) you’re trying to rank for to the tool. It searches for those keywords every day and shows you increases and decreases in ranking positions, which makes tracking the performance of your updates much less time-consuming.
10. Publish your updated blog post and ask Google to reindex it
Once everything is updated, make the changes in your content management system and republish the post.
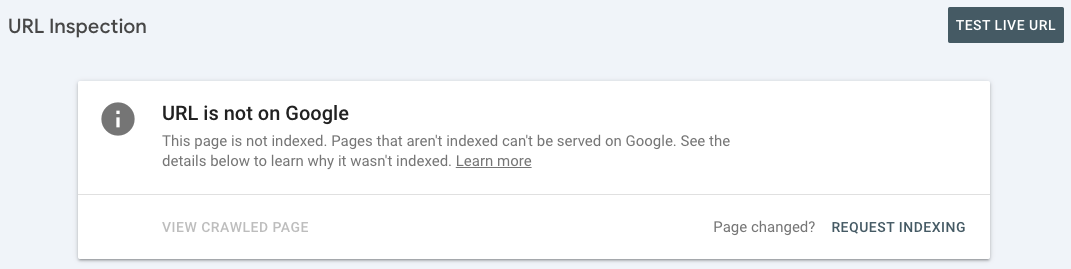
After publishing, I like to ask Google to reindex the post. While Google will notice your updates and reindex them even if you don’t request reindexing, I like to expedite the process by submitting an indexing request in Google Search Console.
To ask Google to reindex your page:
- Open Google Search Console.
- Paste the URL of your updated post into the search bar.
- Click “Request Indexing.”
Developing a long-term strategy for updating content
Success with updating content requires just as much thought and strategy as you put into any other content or SEO initiative.
Just sticking things on a cycle to update them every year is definitely better than never updating your old content at all, but it’s much better to wait until there are signs that the content needs to be updated to get the best return for your effort.
Here’s exactly how I go about deciding which content to update when I first start working with a new client — and continue to identify ongoing updates that are needed over time.
First, I conduct an audit early on where I go through every piece of content on a client’s site.
I enter the URL for every page of the site into a spreadsheet, then I use Semrush to see what keywords each post is currently ranking for (if any) — and in what positions — and document that in the spreadsheet as well.
Then, I classify each post as:
- No change needed if it’s already in position one for a target keyword.
- Needs update if it’s not ranking in position one for any keyword.
After that, I can prioritize the posts listed as “Needs update” based on whatever goals I’m trying to achieve — increasing traffic, generating more trials, etc.
The posts that are listed as “No change needed” get their keywords put into a rank tracker immediately so I can monitor them and see when their rankings start to decline.
And as we update the “Needs update” posts, the target keywords for those posts also get added to the rank tracker.
I check the rank tracker daily so I can see when something needs to be updated as soon as its rankings start to dip.
The content audit also lets me see where we have dueling coverage of a topic. If we have three posts all ranking for the same keywords, a super quick win is to just combine those posts together on whichever URL is ranking the highest.
The content audit process lets me see up front exactly what needs to be updated, and the rank tracking tool lets me know when it’s time for something to be updated again because it’s losing traction in the results.
Get started refreshing your old blog posts
Over the years, I’ve implemented a lot of different on-page, off-page, and technical SEO strategies, but no other strategy I’ve implemented had as large and as quick of an impact as updating existing content.
It takes very little time and delivers results almost instantly.
So use this guide to drive your own incredible results, or if you feel like you need more guidance, please get in touch. I’ll be happy to help you make the most of your existing content.


